How to really configure ADFS with Tableau

(As experienced in Server 2012 R2 and Tableau Server 10.2)

TL;DR: Follow Tableau’s guide but use SHA-1 on the ADFS side, and map SAMAccountName to the “email” Outgoing Claim Type

Looking around the web, it seems like using Microsoft’s ADFS with Tableau Server for Single Sign-On (SSO) is widespread and no big deal to setup. Sure, the steps available on Tableau’s site look a little long, but it’s all pretty straightforward. However, there are a couple things that get left out.

The first issue, which has to do with the Secure Hashing Algorithm (SHA) used to sign requests and responses, is easy to mitigate. When I read a support article from Tableau, I got the sense that Tableau should support SHA-256. However, whether I ran the recommended tabadmin command or not, I always ended up with a failed authentication attempt and the following error on the ADFS server:

SAML request is not signed with expected signature algorithm. SAML request is signed with signature algorithm http://www.w3.org/2001/04/xmldsig-more#rsa-sha256 . Expected signature algorithm is http://www.w3.org/2000/09/xmldsig#rsa-sha1

Meanwhile, Tableau Server presented the following error in C:\ProgramData\Tableau\Tableau Server\data\tabsvc\logs\vizportal\vizportal-x.log:

org.opensaml.common.SAMLException: Received response has invalid status code

The fix? Tell ADFS to use SHA-1 for the Tableau relying party. You or your ADFS admin can do this with the following steps (based on Server 2012 R2):

  • Log into the ADFS server
  • Open AD FS Management
  • Go to Trust Relationships -> Relying Party Trusts
  • Double-click the Tableau Relying Party (the identifier column should match what you put in the SAML entity ID field back on your Tableau SAML config)
  • Click the Advanced tab
  • Set the Secure hash algorithm drop-down to SHA-1
  • Click OK

No ADFS restart will be necessary.

Now, of course, there are security implications with this change. SHA-1 is no longer considered secure, so you should first assess the potential risk for your organization.

Onto the second–and potentially more interesting/confounding–issue. Every guide I checked on how to configure ADFS listed the following attributes in the claims rule:

  • SAM-Account-Name -> Name ID
  • SAM-Account-Name -> username
  • (optional) Surname -> LastName
  • (optional) GivenName -> FirstName

This is definitely what ADFS had configured, but it wasn’t working. I finally turned to the previously-mentioned vizportal log and found this:

org.springframework.security.authentication.AuthenticationServiceException: Incoming SAML message has no valid value for email attribute. Please verify ServiceProvider configuration in Identity Provider.

So… Despite what the docs say, Tableau wants an email attribute? In some cases, this is no big deal. Simply edit your Issuance Transform Rules, and add an attribute that maps “E-Mail-Addresses” to the “email” outgoing claim type. Where it gets tricky is when your email address is not the same thing as your username @ your AD domain. Why would this matter? Because, even though Tableau is receiving an attribute called “username,” it tries to extract domain and username from the email address.

Say your email address is jon.doe@contoso.com. When this gets passed to Tableau, Tableau breaks it apart and tries to sign in as contoso.com\jon.doe. If jon.doe is your username/SAMAccountName and your domain is known internally as contoso.com, then that’s great. However, if your username is actually jdoe and your internal domain is fabrikam.com, this is going to fail with a vizportal error like this:

2017-12-14 10:26:40.253 -0500 (,,,) catalina-exec-4 : INFO com.tableausoftware.domain.user.saml.SAMLExtendedProcessingFilter – Using domain contoso.com extracted from email in saml response for username jon.doe@contoso.com
2017-12-14 10:26:40.253 -0500 (,,,) catalina-exec-4 : INFO com.tableausoftware.domain.user.saml.SAMLExtendedProcessingFilter – Using fully qualified username contoso.com\jon.doe from saml response
2017-12-14 10:26:40.253 -0500 (,,,) catalina-exec-4 : INFO com.tableausoftware.domain.user.saml.SAMLExtendedProcessingFilter – SAML IDP login was successful, proceeding to create session for username : contoso.com\jon.doe authUserId : Optional.absent() displayName : Optional.absent() email : Optional.of(jon.doe@contoso.com) logoutSupported : true on provided target site Optional.absent()
2017-12-14 10:26:41.563 -0500 (,,,) catalina-exec-4 : ERROR com.tableausoftware.domain.user.saml.SAMLExtendedProcessingFilter – SAML Authentication Failed, please contact the administrator.

Fortunately, you still have a couple easy options. First, if your UserPrincipalName uses your standard fabrikam.com domain, rather than something like finance.fabrikam.com, you could map that to the “email” attribute. Alternatively, you could just map SAMAccountName to the “email” attribute. If Tableau doesn’t see an “@” symbol in the email, it will simply pass the username along as-is. Problem solved.

I plan to raise this with Tableau support. It could be that I’ve got something wrong or need to update (yes, I do, but I haven’t seen this mentioned as a known issue/bug fix). But, if you need to move past this quickly, perhaps these tips will help. Good luck!

Redirect HTTPS Tableau Traffic to a Valid URL

You’ve heard it before: it’s past time to encrypt ALL the things! Even internal traffic should be encrypted, since you never know what rogue devices or people may be listening on an ethernet port or an unsecured hotspot. That’s why, when I inherited a Tableau server, I decided that encryption should be a priority. Especially when you consider the kind of data that can flow in and out of Tableau. And, Tableau makes it surprisingly easy to turn on TLS (or SSL, as they and so many others like me still call it). What they don’t make so easy is redirecting users over to an address that matches your cert. No big deal if your users have always accessed Tableau Server with the right alias, but until now, we only had an internal address that doesn’t match the cert we applied. The good news is Tableau Server uses Apache for its web server. With a pretty small tweak, you can redirect your users in no time.

Please note: this is not documented or supported by Tableau as far as I can tell. Be sure to test thoroughly before applying to your production environment. I also assume these settings will be overwritten by an update/upgrade, thus needing to be reapplied afterward (update: Having since gone through a few upgrades, I can confirm that these settings need to be reapplied afterward).

As I mentioned, Tableau Server uses Apache for its web server. An interesting choice since Tableau is only supported on Windows. This means a couple rewrite conditions/rules in httpd.conf will have you off and running. The first thing you need to know is where this file lives. It will be under Tableau’s data folder, which is located based on which drive Tableau was installed on. Tableau was installed on C: for us, which puts the httpd.conf file in C:\ProgramData\Tableau\Tableau Server\data\tabsvc\config (we will talk about moving your data folder to another drive in a later post). I am not entirely certain what the structure looks like if you installed on a separate drive, so you may need to do some digging.

Once you have located the httpd.conf file, the second thing you need to know is that this file is formatted for *nix line feeds and carriage returns. I.E: If you open it in Notepad, it will all be jumbled together. If you already have a tool like Notepad++ installed on the server, it should do nicely. In my case, I chose to copy the file to my local machine, edit it with Atom, and then push it back to the server. Just be sure to make a backup of the file first.

Ok, so you’ve found httpd.conf, you’ve made a backup, and opened it up in your favorite *nix-friendly text editor. If you scroll down to around line 581, you will start to see several RewriteCond and RewriteRule lines. Our rules don’t have to go here, but it seemed logical since there are already related rules in the vicinity. If you aren’t familiar with mod_rewrite rules, they basically look for certain conditions in an Apache request and rewrite/redirect (with a 301 by default) the URL sent to the server. Here is what I added after Tableau’s built-in list of rewrite rules:


RewriteCond %{HTTP_HOST} !^tableau\.mycompany\.net [NC]
RewriteCond %{HTTP_HOST} !^localhost [NC]
RewriteRule (.*) https://tableau.mycompany.net$1 [R=301,L]

What does each line mean? The first line looks for requests containing a URL that doesn’t match the address we want people to use. Replace “tableau.mycompany.net” with your company’s preferred address for Tableau. Of course, make sure the record actually exists in DNS and points to your Tableau server.

The second line is an AND condition (by virtue of the previous line not ending in “[OR]”) and filters out requests using the “localhost” URL. The reason for this is that Tableau Web Data Connectors (WDC) published on the server will always be refreshed using http://localhost/webdataconnectors/yourWDCname.htm. And, as I found out, Tableau won’t follow the redirect when it tries to extract, but it will seemingly ignore the certificate/server name mismatch. Adding this line makes sure we don’t break any scheduled extracts using a WDC. Side note: it seems that in Tableau 10, you can maintain a list of approved WDC’s external to Tableau (aw yeah!), which I find preferable and would make this line unnecessary.

Now, the third line. This line takes the requests that haven’t been filtered out by the two previous conditions, and rewrites them to use our preferred address. Notice that here I have added the protocol (https://), whereas it is not needed for the conditions since we want to catch HTTP and HTTPS requests. The variables at the end will keep the rest of the URL as-is, so that something like http://nyctabprd01.internaldomain.net/#/views/some/content becomes https://tableau.mycompany.net/#/views/some/content, rather than redirecting to Tableau’s landing page.

Once you have updated httpd.conf with the lines above, restart Tableau Server (tabadmin restart). Now, whenever someone tries the old address, they should be redirected to the new one. This all depends on the visitor or other clients following a 301 redirect, which is pretty standard. Still, be thorough in your testing to account for all conditions.

That’s it! A lot of talking for 3 lines of text.

Compare-ObjectIs: No more weird Foreach… -Contains code

Yesterday, I was again faced with the task of using PowerShell to determine whether one array contained any of the values in another array. Specifically, I had an array of AD group Distinguished Names (DN) and needed to determine if users were members of any of these groups (an LDAP filter would probably be easier, but I was already invested in solving this). Typically, I would handle this with something of a foreach loop: for each user, loop through each of their group memberships and see if the group array contains their group string. This always feels terribly inefficient, so I wanted to find a cleaner way of handling these types of comparisons.

Looking around online, I realized PowerShell has a Compare-Object cmdlet, which sounded promising. It works by accepting a -ReferenceObject and -DifferenceObject, and comparing which values are the same or different between the two. Now, this cmdlet is almost helpful, but really works better for someone interacting with the shell, rather than a script. The output looks something like this:

Screen Shot 2016-05-19 at 7.43.10 AM

The “SideIndicator” tells us which object/array (the reference, or the difference object) has a different value. In this example, the second array contains “orange,” but the first array does not. Conversely, the  first array contains “apple,” but the second does not. Again, handy if you are in the shell, but how do you use this in a script. Well, here is the short of what I came up with:

compare-object $_.MemberOf $includeGroups -includeequal -excludedifferent

You might first notice that there are no “-ReferenceObject” or “-DifferenceObject” parameter names spelled out above. That is because, as with all PowerShell cmdlets, if you specify parameters in the right order, you can skip those names. So, in this case, $_.MemberOf is the reference object and $includeGroups is the difference object. The next two switches are very important for this to work. “-includeequal” tells the cmdlet to return the items that match between the two objects and “-excludedifferent” prevents it from returning the objects that are different. This is because, for this comparison, we really only care about the items that match across arrays.

Continuing the fruit example above, here is what we see:

Screen Shot 2016-05-19 at 7.52.05 AM

This “==” tells us that “pear” and “banana” exist in both arrays. Since we exclude differences, if there are no matches this cmdlet will return $null. That means we can do something like this:


if ( compare-object $MemberOf $includeGroups -includeequal -excludedifferent ) {

  #Do something

}

Or…

... | Where { compare-object $_.MemberOf $includeGroups -includeequal -excludedifferent }

Of course, format it however you would like and surround with parenthesis when using multiple conditions. I feel a little silly that this cmdlet has been there since PowerShell version 3, but I am at least satisfied that I no longer need to employ cumbersome foreach loops in these situations.


SSH Key Auth Fails when using Git with Sudo

Flashback about two years, and I had never touched git. GitHub was that place where you clicked the Download link to get a zip of the code you wanted. That being the case, I am still learning as I go. The other day, I drove myself crazy over a complete n00b mistake, which I am embarrassed to admit.

While working on an Ubuntu server, I was trying to pull changes from a Bitbucket repo into a subdirectory of /var/www. Every time I ran “git pull origin master,” the following error was displayed:

Permission denied (publickey).
fatal: Could not read from remote repository.

I knew the correct SSH key had been added to my profile, but I ran “ssh -T hg@bitbucket.org” to be sure. This returned the positive and expected:

logged in as jdoe.

So, why did it fail when I tried a git pull? I double-checked my remote, removed and re-added it to be sure. Then, it hit me! Because of the permissions set on the current directory, I was having to use sudo for all my git commands. But, sudo doesn’t know about my SSH keys (at least by default). After realizing this, the fix was easy: correct the permissions on the directory (which I should have done from the beginning instead of working around it with sudo) and add myself to the directory’s group. Sudo was no longer required and my authentication attempt worked beautifully.

Again, I hang my head in shame over this, but thought I should share in case someone else has a temporary lapse in judgement.

(While verifying the cause, I came across a quick guide that will forward your key to sudo, if you really must.)

routeToS3: Storing Messages in S3 via Lambda and the API Gateway

(If you want to cut to the chase, skip the first four paragraphs.)

Over the past year, Amazon Web Services (AWS) has previewed and released several new services that have the potential to drive the cost of IT down. This includes services like EFS and Aurora, but the service I was most excited about was Lambda. Lambda is a service that executes code on-demand so you don’t have to pay for an entire EC2 instance to sit around waiting for events. I recall at my previous position having a server that only existed to execute scheduled tasks. As supported languages expand, Lambda has the potential to completely replace such utility servers.

There are many ways to trigger Lambda functions, including S3 events, SNS messages and schedules. But, until recently, it wasn’t straightforward to trigger a Lambda event from outside your AWS environment. Enter Amazon’s fairly new API Gateway. The API Gateway is a super simple way to setup http endpoints that communicate with AWS resources, including Lambda functions. And, you don’t have to be a seasoned developer to use it. In fact, I had only recently started learning some standard concepts while playing around with the Slim Framework for PHP. While understanding RESTful APIs will help the API Gateway feel more natural, you can get started without knowing everything.

Let me back up a bit and explain why I came across the API Gateway in the first place. SendGrid has become our go-to service for sending email from various applications. I can’t say enough good about SendGrid, but it has some intentional limitations. One of those is that it will store no more than 500 events or 7 days (whichever comes first) at a time. You still get all your stats, but if you need to look up what happened to a specific email two weeks ago (or two minutes ago depending on your volume), you’re out of luck. Fortunately, SendGrid thought this through and made an event webhook available that will POST these events as a JSON object to any URL you give it. “Perfect!” I thought, “We can build something to store it in RDS.” But first, I thought it prudent to explore the Internet for pre-built solutions.

My research brought me to Keen.io, which was the only out-of-the-box solution I found that would readily accept and store SendGrid events. If you are here for the exact same solution that I was looking for, I strong recommend checking out Keen.io. The interface is a little slow, but the features and price are right. We would have gone this route in a heartbeat, but had some requirements that the terms of service could not satisfy. With that option gone, I was back to the drawing board. After brainstorming many times with my teammates, we finally came up with a simple solution: SendGrid would POST to an http endpoint via the API Gateway, which would in turn fire up a Lambda function, which would take the JSON event and write it to an S3 bucket. The reason for S3 instead of something more structured like RDS or SimpleDB is because we can use Splunk to ingest S3 contents. Your requirements may be different, so be sure to check out other storage options like those I have mentioned already.

SendGrid Logging Diagram

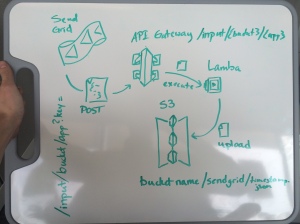
The initial plan. The API structure changed, but the flow of events is still accurate.

Now that we have introductions out of the way, let’s jump in and start building this thing. You will need to be familiar with creating Lambda functions and general S3 storage management. Note that I will borrow heavily from the API Gateway Getting Started guide and Lambda with S3 tutorial. Most of my testing took place on my personal AWS account and cost me $.02.

Create an S3 Bucket

The first thing you need to do is create your S3 bucket or folder that will store SendGrid events as files (you can also use an existing bucket). The simple GUI way is to open your AWS console and access the S3 dashboard. From there, click the Create Bucket button. Give your bucket a unique name, choose a region and click Create.

Create a Lambda Function

This won’t be an in-depth guide into creating Lambda functions, but we will cover what you need to know in order to get this up and running. At the time of writing, Lambda supports three languages: Java, Node.js, and Python. I will use Node.js in this guide.

The Code

Create a file called index.js and add the following contents:


//Modified from AWS example: http://docs.aws.amazon.com/lambda/latest/dg/with-s3.html

var AWS = require('aws-sdk');

exports.handler = function(event, context) {
console.log("routeToS3 Lambda function invoked");

//Restrict this function so that not just anyone can invoke it.
var validToken = event.validToken;
//Check supplied token and kill the process if it is incorrect
var token = event.token;
if (token != validToken) {
console.log('routeToS3: The token supplied (' + token + ') is invalid. Aborting.');
context.fail('{ "result" : "fail", "reason" : "Invalid token provided" }');
} else {
uploadBody(event, context);
}
};

uploadBody = function(event, context) {

var bucket = event.bucket;
var app = event.app;
var timestamp = Date.now();
var key = app + '_' + timestamp;
var body = JSON.stringify(event.body);

var s3 = new AWS.S3();
var param = {Bucket: bucket, Key: key, Body: body};
console.log("routeToS3: Uploading body to S3 - " + bucket);
s3.upload(param, function(err, data) {
if (err) {
console.log(err, err.stack);// an error occurred, log to CloudWatch
context.fail('{ "result" : "fail", "reason" : "Unable to upload file to S3" }');
} else {
console.log('routeToS3: Body uploaded to S3 successfully');// successful response
context.succeed('{ "result" : "success" }');
}

});
};

This script will become your Lambda function and has a few key elements to take note of. First, it declares a variable named AWS with “require(‘aws-sdk’)”. This pulls in the aws-sdk Node.js module, which is required for writing to S3. With most Node.js modules, you will need to zip up the module files with your Lambda function. However, the AWS SDK is baked in, so you don’t need to worry about uploading any dependency files with the above function.

Next, the function declares a series of variables, starting with “validToken” and “token.” This might be where most seasoned API engineers roll their eyes at me. When possible, it makes sense to handle authentication at the API level and not inside your function. In fact, the API Gateway has this functionality built in. However, the supported method requires a change to the incoming requests header. That is not an option with SendGrid’s event webhook, which only gives you control over the URL, not the data. So, I had to cheat a little. We will cover this a little more when we setup the API, but for now it is sufficient to understand that token must match validToken for the function to work. Otherwise, the function will exit with an error.

Moving on to the other important variables:

  • bucket – The bucket or bucket/path combination (e.g.: my-bucket/SendGridEvents)
  • app – The name of the app these events are coming from; will be used as the resulting file’s prefix
  • timestamp – The current timestamp, which will be used to make the file name/key unique
  • key – constructed from app and timestamp to generate the file name

All of these variables will be passed in via the API Gateway as part of the event variable. That is why they all look something like “bucket = event.bucket”.

When this script is run, the very first thing Lambda will do is call the “exports.handler” function. In our case, exports.handler simply checks the token and, if it is correct, calls the “uploadBody” function. Otherwise, it exits the script and writes an error to CloudWatch via console.log.

Zip up index.js and use it to create a new Lambda function named “routeToS3.” You can do this all through the GUI, but I am more familiar with the CLI method. Not because I am a CLI snob, but because when Lambda first came out, only account admins could access the Lambda GUI.

Create your API

The AWS API Gateway enables people to build APIs without typing a line of code. It’s really fast to get something up and running. In fact, when all I meant to do was make sure my permissions were set correctly, I accidentally built the whole thing. I recommend checking out AWS’s guide, but you can also learn a bit by following along here.

To start…

  1. Log into your AWS console and open up the API Gateway service and click the Create API button.
  2. Name your API routeToS3 and click the next Create API button.
  3. With the root resource selected (it should be your only resource at this point), click Actions -> Create Resource.
  4. Name the resource “input” and set the path to “input” as well.
  5. Select /input from Resources menu on the left.
  6. Click Actions -> Create Method.
  7. In the dropdown that appears on the Resources menu, select POST and click the checkmark that appears to the right.
  8. For Integration Type, choose Lambda Function.
  9. Set your Lambda Region (choose the same region as your S3 bucket).
  10. Type or select the name of your Lambda function (routeToS3) in the Lambda Function field.
  11. Click Save
  12. When prompted to Add Permission to Lambda Function, click OK.

Congratulations! You just built an API in about two minutes. Now, in order to make sure the Lambda function gets all the parameters we mentioned earlier (body, bucket, app, etc.), we need to configure query strings, a mapping template, and a stage variable. We won’t be able to create a stage variable just yet, so that will come a little later.

With your POST method selected in the Resources menu, you should see a diagram with boxes titled Method Request, Integration Request, Method Response, and Integration Response:

POST Function

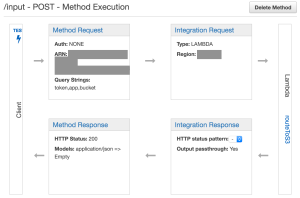
Click on Method Request to setup our query strings. From here, click to expand the URL Query String Parameters section. Any query string we add here will act as what some of us might refer to as GET parameters (e.g.: /?var1=a&var2=b&var3=etc). To setup the strings we will need, follow these steps:

  1. Click the Add query string link.
  2. Name the string token and click the checkmark to the right.
  3. Repeat for app and bucket.

Go back to the method execution overview by clicking POST in the Resources menu or <- Method Execution at the top.

Next, we will add a mapping template:

  1. Click Integration Request.
  2. Expand the Body Mapping Templates section.
  3. Click Add mapping template
  4. Type application/json (even though it is already filled in and doesn’t disappear when you click inside the text box) and click the checkmark to the right.
  5. Click the pencil icon next to Input Passthrough (it’s possible you could see “Mapping template” instead).
  6. Add the following JSON object and click the checkmark

{
"bucket": "$input.params('bucket')",
"app": "$input.params('app')",
"token": "$input.params('token')",
"validToken": "$stageVariables.validToken",
"body": $input.json('$')
}

This mapping will take the body of the request and our variables, and pass them along as part of the event object to Lambda. Note that all values, like “$input.params(‘bucket’)” are wrapped in double quotes, except for $input.json(‘$’). That is because we are actually calling a function on the body (‘$’), so wrapping it in quotes will break things.

Now, it’s time to deploy our API, which will make it accessible over HTTP. But, we haven’t tested it yet and that validToken variable is still undefined. Don’t worry, we haven’t forgotten those two critical pieces. But, we have to create a stage first, which is part of the deployment process.

  1. Click the Deploy API button at the top of the screen.
  2. On the screen that appears, choose [New Stage] for the Deployment Stage.
  3. Choose a name for the stage (Stages are like different environments, for example dev or prod).
  4. Enter a Deployment description and click Deploy.

On the screen that follows, you will see a tab labeled Stage Variables. Open this tab and click Add Stage Variable. Name the variable validToken and enter a token of your choosing for the Value. Use something strong.

Go back to the Settings tab and take a look at the options there. You may be interested in throttling your API, especially if this is a development stage. Remember that, although the API Gateway and Lambda are fairly cheap, too much traffic could rack up a bill. Since we aren’t using a client certificate to authenticate the calling app, we have to invoke the Lambda function to verify the provided token. Just something to keep in mind when considering throttling your API.

Now that I’ve distracted you with some prose, click Save Settings at the bottom of the page.

At the top of the screen, you will see an Invoke URL. This is the address to access the stage you just deployed into. All of our magic happens in the /input resource, so whatever that invoke URL is add “/input” to the end of it. For example, https://yudfhjky.execute-api.region.amazonaws.com/dev would become https://yudfhjky.execute-api.region.amazonaws.com/dev/input.

With our stage setup, we can now test the method.

  1. Go back to the routeToS3 API and click on the POST method in the Resources menu.
  2. Click Test.
  3. Enter a token, app, and a valid bucket/folder path (e.g.: my-bucket/routeToS3/SendGrid)
  4. Enter a value for validToken (this should be the same as token if you want the test to succeed).
  5. For Request Body, type something like {“message”: “success”}.
  6. Click Test.

You should see the CloudWatch logs that indicate the results of your test. If all is well, you will get a 200 status back and a corresponding file will appear the bucket you provided. The file contents should be {“message”: “success”} or whatever you set for the request body.

If things are working as expected, then it is time to head over to SendGrid and configure your event webhook:

  1. Log into SendGrid.
  2. Click Settings -> Mail Settings.
  3. Find Event Notification.
  4. Click the gray Off button to turn event notifications on.
  5. If needed, click edit to enter the HTTP POST URL.
  6. Enter the URL to your API endpoint, along with all necessary query strings (e.g.: https://yudfhjky.execute-api.region.amazonaws.com/dev/input?bucket=my-bucket/routeToS3/SendGrid&token=1234567890&app=SendGrid).
  7. Click the checkmark.
  8. Check all the events you want to log.
  9. Click the Test Your Integration button.
  10. Wait a couple minutes and then check your bucket to see if SendGrid’s test events arrived.

Tada! You should now be logging SendGrid events to an S3 bucket. Honestly, it’s much simpler than you might think based on the length of this post. Just keep the perspective that all of this is accomplished with three lightweight and low-cost services: the API Gateway to receive the event from SendGrid, Lambda to process that event and upload it to S3, and S3 to store the body of the SendGrid event. I hope you find this as helpful and straightforward as I have.

FTP to Google Drive

Let’s be clear that Google Drive does not provide FTP access to your content. But, that doesn’t mean it isn’t possible. I’ve been playing recently with a wireless security camera that can send images to an FTP server fairly easily. But, I didn’t have something reliable in the cloud handy and for the right price. Google Drive seemed like an excellent storage solution, but there was no way for the camera to utilize it… Directly.

At some point, I remembered I had a 2006 Mac Mini sitting around. The older versions of OSX make it really simple to get an FTP server up and running, which is the boat I found myself in:

  • Open System Preferences
  • Go to Sharing
  • Enable File Sharing
  • Modify permissions and paths to your liking
  • FTP will now be available on port 21

If you want to use a Mac for this exercise and you have a newer OS installed, you may need to follow these steps.

First half of your work? Done. The next step is pretty simple: Download and install the Google Drive app (tip: limit the folders Google Drive will sync if this will be a single-use computer/server). Google Drive content will be accessible at /Users/username/Google Drive. However, if like me, your camera or other client doesn’t play nicely with spaces. A symlink (or a shortcut in Windows) took care of this. I ran a command like this to create a space-free symlink:

ln -s ~/Google\ Drive/ ~/googleDrive

The backslash (“\”) escapes the space in a *nix environment. Now, anytime you write to /Users/username/googleDrive, you will actually be writing to your Google Drive folder. That means, if you use this path in your FTP configuration, you are essentially writing to Google Drive using FTP. Sneaky, sneaky. It worked beautifully for me. In fact, it worked a little too well. I didn’t quite nail the security camera’s sensitivity level and woke up to more than 10,400 images synced to Google Drive.

But, are there downsides? Of course. First and foremost is that, at least in my setup, it means one more device powered up. The Mini isn’t the worst thing to have going, but it also isn’t your only option if you want to be a little more green. You could setup something in AWS or Azure, use a Raspberry Pi, etc., but keep in mind there is no official Google Drive app for Linux yet. The second downside is that Google Drive only runs, and therefore only syncs, when you are logged in. That means, my Mac Mini is setup for automatic login, never goes to sleep, and starts up immediately after a power failure.

It’s not a perfect setup, but it worked in a pinch. My next task is setting up a secure proxy to the camera’s web interface. Another need the Mini can easily fill.

Crawling Commented Styling with Heritrix

This post isn’t something I can take credit for. The purpose is to make two potential solutions discoverable for someone like me, looking for an answer. Credit will be given where it is absolutely due.

As I’ve written about before, I inherited a Wayback/Heritrix server in my role and have had the pleasure of hacking my way through it on occasion. A recent challenge arose when I needed Heritrix to crawl an old Plone site. The Plone template placed html comments around all the styling tags to hide it from older browsers, which couldn’t understand the CSS. The result looks something like this:

<style type="text/css"><!--
/* - base.css - */
@media screen {
/* http://servername.domain.net/portal_css/base.css?original=1 */
/* */
/* */
.documentContent ul {
list-style-image: url(http://servername.domain.net/bullet.gif);
list-style-type: square;
margin: 0.5em 0 0 1.5em;
}
--></style>

Unfortunately, it seems Heritrix happily skips past any URLs within comments by default and does not follow them, regardless of your seeds and other configurations. Because, hey, they’re only comments, right? The end result is that it looks like the site was crawled successfully, but some resources were actually missed. In the above example, the Wayback version of the site was still pointing to http://servername.domain.net/bullet.gif for thelist-style-image, rather than http://wayback.domain.net:3366/wayback/20151002173414im_/http://servername.domain.net/bullet.gif. Therefore, it was not a complete archive of the site and its contents.

In my case, this was an internal site that I had total control over. However, try as I might, I could not figure out how to remove the comments from the old Plone template. Grepping for ‘<style type=”text/css”><!–‘ turned up ‘_SkeletonPage.py’. I tried modifying it and then running buildout to no avail. I am sure people more experienced with Plone could tell you where to change this in a heartbeat, but it’s beyond my knowledge with the application at this point. After coming up short on searches for solutions with Heritrix (thus, this post), I started looking for ways to remove the comment tags with something like Apache’s mod_substitute, since Plone was being reverse-proxied through Apache anyway.

Solution 1: Mod_Substitute/Mod_Filter

Eventually, I stumbled upon this configuration from Chris, regarding mod_substitute and mod_filter. Mod_filter needed to be used for mod_substitute to work properly because of the content being reverse-proxied. A simple modification of Chris’s configuration worked to remove the comment tags beautifully (using CentOS/Httpd for reference):

LoadModule substitute_module modules/mod_substitute.so
LoadModule filter_module modules/mod_filter.so
FilterDeclare replace
FilterProvider replace SUBSTITUTE Content-Type $text/html
FilterChain +replace
FilterTrace replace 1
Substitute "s/css\"><!--/css\">/n"
Substitute "s|--></style>|</style>|n"

(Note: I probably could have made this a little more efficient by using a single regex instead of two separate substitutes. But, meh. This was good enough.)

Chris recommended loading this into a new file: /etc/httpd/conf.d/replace.conf.

Solution 2: Hack Heritrix

While exploring my options with Apache, I also decided to reach out to the archive-crawler community on Yahoo! for help. A user identified as “eleklr” shared a patch that he used often for this kind of scenario. I think this is the better route to go, though I have not had an opportunity to try it out yet. Its biggest strength is that it doesn’t require you to have complete control over the site you are crawling, as is necessary for solution 1.

If you’ve found yourself in my position, rejoice in the fact that it’s not just you and there are solutions out there. Hopefully, one of the two listed above will help you on your way. Please share if you’ve discovered other solutions to this or similar problems.

Who Isn’t Taking Out the Trash? Use WinDirStat and PowerShell to Find Out.

Using WinDirStat to find unnecessary files on a hard drive is a pretty routine task. A common find is that someone’s recycling bin has large zip or executable files. WinDirStat is helpful for showing this to you, but it only reveals the user’s local SID, such as:

S-1-1-12-1234567890-123456789-123456789-123

It’s not terribly difficult to track down the associated profile using regedit. Still, clicking through a series of plus buttons in a GUI seems inefficient. Here is a simple method I used today to make this process a little quicker. Ok, so it took a bit longer than clicking through the first time, but it will be quicker for me next time:


((get-itemproperty "hklm:\Software\Microsoft\Windows NT\CurrentVersion\ProfileList\*") | where {$_.pschildname -like "S-1-1-12-1234567890-123456789-123456789-123"}).ProfileImagePath

This will return the ProfileImagePath value, which is the file path to the guilty profile. If you want to cut straight to the username, try this:


(((get-itemproperty "hklm:\Software\Microsoft\Windows NT\CurrentVersion\ProfileList\*") | where {$_.pschildname -like "S-1-1-12-1234567890-123456789-123456789-123"}).ProfileImagePath).split("\")[-1]

When a Hub Transport/CAS Blows Up

Here’s a fun one that’s been sitting in draft status since 2013. I now vaguely recall the incident, but was apparently too tired from the evening’s work to complete the telling. The great part is that it leaves off with a cliffhanger ending. I’m tired of seeing it in my drafts, but there might be useful info for someone in here. Maybe you can help complete the story in the comments!

The original post…

(The exciting tale of our Windows 2003 R2, Exchange 2007 Hub Transport/CAS)

Finishing up Windows updates on the servers. Doing a last round of checks on all services. Hmmm… Can’t log into Outlook Web Access. Wow! Vsphere shows the CPU has been pegged non-stop since it was rebooted.

That realization came at about five-o-clock in the morning. OWA’s login screen loaded slowly, but would just spin and spin on the actual authentication process. As mentioned above, the CPU was pegged with countless DW20.exe processes. I was not familiar with the process name but quickly learned it was Windows Error reporting. Meaning something was crashing so often and so quickly, Windows was using all of its resources writing to the event log. Unfortunately, this meant there were no resources for me to actually troubleshoot.

Step 1, boot in safe mode and disable error reporting. I found several suggestions for disabling error reporting with registry values, but none of these worked. Thanks to http://blogs.msdn.com/b/rahulso/archive/2007/03/29/dw20-exe-was-stopping-us-from-taking-the-crash-dumps-in-w3wp-exe.aspx, I found the easiest way to stop reporting errors is this:

  • Open Advanced System Settings
  • Go to Advanced > Error Reporting
  • Uncheck Programs > OK > OK

With error reporting turned off and back in normal mode, I could actually start troubleshooting. The Application log had recorded errors something like this (Sorry, I could remote into work to get the exact error, but that would kill the precious bandwidth being consumed by Netflix right now):

.NET Runtime version 2.0.50727.3053 – Fatal Execution Engine Error

http://support.microsoft.com/kb/2540222 seemed to describe the problem, so I ran the hotfix. Unfortunately, this did not stop the errors. Next step, install .NET 3.5. Still no help. Business hours were getting closer. Finally, I decided to uninstall all versions of .NET and start over. It is helpful to know that you need to uninstall them in reverse order, starting with the latest version installed. Otherwise, you will get a dependency error. Once all versions were removed, I reinstalled 2.0, followed by 3.5 SP1.

Finally, a little success! OWA loaded at a normal pace. But, authentication attempts immediately timed out. Evidently, the reinstallation of .NET caused IIS to turn off ASP.NET scripting. This (http://www.microsoft.com/technet/prodtechnol/WindowsServer2003/Library/IIS/9fc367dd-5830-4ba3-a3c9-f84aa08edffa.mspx?mfr=true) was a quick fix. However…

And that’s where the draft left off. I remember getting a call late in the afternoon while trying to rest up because the CAS was acting up again. I believe a restart took care of it that time. This was all essentially the result of a corrupt .NET Windows update. But, what came after the “However…”? Have an idea? Throw it in the comments, because I haven’t the foggiest.

Starting and stopping Heritrix and Wayback

(note: this post references CentOS specifically)

Hopefully, you’re familiar with the Internet Archive’s Wayback machine; a service that lets you to see historical snapshots of web sites. But, you may not realize that you can setup your very own Wayback service on a server. Or, maybe like me, you’ve just had this service dropped in your lap with very little experience. If that’s you, this is a quick post for you.

TL;DR


/etc/init.d/heritrix stop/start

/etc/init.d/tomcat stop/start #Assuming your Wayback service uses the default tomcat/5 name

As I mentioned, managing a Wayback server came rather suddenly to me and I found documentation either lacking or over my head. I started encountering a problem where every site would show up as “Not in archive” even when I knew the site was in the index. Since I couldn’t find quick answers and generally didn’t have a lot of time to dedicate, the quick fix was a reboot.

This morning, I finally stuck it out long enough to identify which service Wayback was running under and which of the two underlying services (Heritrix or Wayback) was the culprit. The short story is that this error is caused by a problem with the Heritrix service. Restarting it (after killing the orphaned process) cleared things up. This is a quick summary of what steps I took–which were standard steps for any service–to identify each service.

Heritrix

Maybe you’ve seen this word pop up in access logs. It is the web crawler Wayback depends on to archive web sites. Heritrix creates an index, or archive, of crawled sites. Wayback calls these archives (in WARC format) up when you want to view one. So, when a site isn’t in the archive that should be, Heritrix is your candidate.

This was the easy one, but I didn’t jump to it first, because Wayback presented the error. But, it looks like Heritrix generally shows up under the service name “heritrix,” which means you just have to type something like “/etc/init.d/heritrix stop” and “/etc/init.d/heritrix start” to stop and/or start the service. The problem this morning was that the process was orphaned, so I couldn’t simply stop it. The following command verified that the process was orphaned:


ls /var/run/heritrix.pid

The file didn’t exist, which explained why the service couldn’t be stopped: there was no PID associated with it. Examining /etc/init.d/heritrix showed me that the configuration, which I assumed would contain the port for Heritrix, was located in /etc/sysconfig/heritrix. Opening this file up revealed the port Heritrix was running on, via the “Dcom.sun.management.jmxremote.port” setting. This allowed me to identify the orphaned process using the following command (where “1234” represents the port Heritrix is running on):

sudo netstat -tulpn | grep 1234
tcp        0      0 :::1234        :::*        LISTEN     2804/java

 So, a quick “kill 2804” and a “/etc/init.d/heritrix start” got Heritrix up and running again. Within a couple minutes, I could access the site in the archive without an error.

Wayback

The Wayback service was a little trickier to identify because, at least in my case, it used the generic “tomcat” service name. I knew the port that the Wayback service was running on because of using the interface often. I was able to grep around long enough to dig up /usr/local/apache-tomcat/webapps/wayback/WEB-INF/wayback. Viewing /etc/init.d/tomcat confirmed that this was inside the $CATALINA_HOME directory. So, that was the connection. The Wayback info was in the $CATALINA_HOME directory, and the tomcat service pointed to $CATALINA_HOME. “/etc/init.d/tomcat stop/start/restart” was all I needed. But, don’t assume your Wayback service is the same since multiple instances of Tomcat can run on a server.

Nothing groundbreaking here, but it would have been much faster if I had found references to service names and dependencies. If you are in the same position as me, I hope this clears things up a bit. I’m not a Wayback/Heritrix expert, but I certainly know a lot more today than I did when I first started out.